Wednesday, October 16, 2013

Kids Halloween Pillowcases


I've always had this irrational fear of the sewing machine and have never wanted to learn how to sew because of it. But I finally decided to suck it up and let my mom teach me how to sew.  :P

My very fist project were some halloween pillowcases for my kids. I thought these would be a fun way to add some halloween decor to their rooms. These pillowcases were sooo easy! I used THIS great tutorial but I used slightly different measurements. I wanted my trim to be a little bigger and my cuff to be a little smaller. Other than that I followed the tutorial exactly and am so happy with how they turned out! And now that I'm finally over my sewing fears I can start making more fun projects. :)

Here are the measurements I used:
Main body: 27"
Cuff: 7"
Trim: 4"


I made these while the kids were at school and surprised them when they came home. I added a few candies and crafts to get them in the Halloween spirit. :) I love how they turned out and my kids love sleeping on them. I'm planning to make them some Christmas ones, too. :)


-marie

Thursday, October 10, 2013

DIY Halloween Spell Book


 I've been wanting to make a spell book for my Halloween decor for a while now and have seen a lot of great ones on Pinterest. But I wasn't able to find any with pages I could print off. So I created my own in Photoshop and am sharing them with anyone who wants to make their own. With the pages already created, this book is soooo easy to put together. There's still time to whip one up before Halloween! :)

To begin with, you'll need a book. I found this one at Savers in the "vintage" book section. I liked that it was already black and the pages were yellow and aged so I didn't need to do anything extra to the book.  A huge time saver!


To get the pages to curl, I used my handy little squirt bottle. I sprayed water on the corners as I lifted the pages. This gave it some texture and the water made the pages more pliable.

Next, you'll want to print the spell pages. My book was 8.25"x5.5" so if you have a different sized book make sure to size it properly. I just printed it on regular copy paper.


 This next step is completely optional, but I wanted the paper to feel just a little more aged. So I set the oven to 200ยบ and lined a cookie sheet with foil. I sprayed a light mist of water over the pages (make sure the printer ink is dry!) and bake for about 5-7 minutes until the edges begin to curl.


 To mount the spell pages in the book, I used Mod Podge, but a spray adhesive would work really well, too.

Next, I super glued a black ribbon down the middle of the book.
 
Now it's ready to be displayed!


If you want to make your own, you can download the spell pages HERE.  Be sure to let us know if you make one, we'd love to see it!


-marie

Monday, September 9, 2013

Fall Burlap Wreath

I wanted a simple and easy wreath to hang on our front door. We are renting for now and I needed a wreath that would not blend into our door. I decided to do a burlap wreath, so here is how I made it...


First of all, I cut strips of my burlap and wrapped a $1 store pool noodle. Once at the end, I put a dab of hot glue to secure the burlap to the noodle.


 I took one of my small wreaths and pulled it all apart. I took the individual branches and placed it where I wanted them and secured them in place with the craft wire that was originally holding the branches together.


I then took some fake leaves that I already had and hot glue gunned them in place. I added a few pine cones that I had as well. My wreath was ready to be hung on the door!


-chelz


Friday, September 6, 2013

Easy Fall Tree


I had some branches in my backyard from a tree we took down forever ago and wanted to spray paint them black for some Halloween decor. But I was talking with Chelsea one day about it and we got to thinking that it might be better to paint the branches white so that we could use them for other holidays as well. 


The first thing I wanted to make was a Fall Thankful Tree. I've seen these around a couple places and think they are just so pretty. So I gathered up my branches and gave them a couple coats of white spray paint. I used the cheap white paint and it took an entire can to do two coats. I didn't cover the branches completely because I still wanted them to have a bit of a rustic feel. 

Once they were dry I found an old vase I had sitting around and I arranged the branches how I wanted them and tied a bow on it. Then I used a circle hole punch to cut out some circles from scrapbook paper and hung them on the tree. I'm planing to do a family night soon about gratitude and have the kids all write down things they are thankful for on the back of the circles.  

I really love how it turned out and think it goes nicely with my fall decor. I just love decorating for this time of year!!!


Wednesday, September 4, 2013

More Personalized Scriptures


I made my daughter some personalized scriptures two years ago and decided it was time to make some for my boys. After seeing how hers held up, I decided to make a few changes. 

This time I used mod podge to put the paper on the scriptures so that the edges wouldn't come up. I spread mod podge over the entire surface of the scriptures and smoothed the scrapbook paper on top. 


I also made sure to make the paper long enough to go all the way around the front cover and inside a little. I noticed on my daughter's set that this is where a lot of wear came from. 

Since these were for my boys I didn't embellish them but kept them nice and simple. I really like the way they turned out and my boys just love them. We use them for family scripture time each night and it has made a world of difference having them each have their own set. My 3 year olds love thumbing through them and it gives their hands something to do while we are reading. 


Thursday, August 29, 2013

Rainbow Sugar Cookies

A few weeks ago, we made our edible glitter and here is what we did with it. We decided to make rainbow sugar cookies. You can get the sugar cookie recipe that I used from here. I doubled the batch cause we were taking these to a family reunion. 

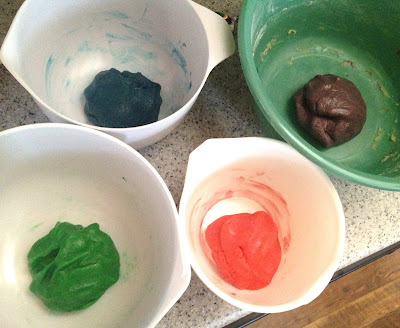
I then separated the dough into 5 bowls. I left 1 bowl its normal color of yellow. I then added food coloring to my dough and mixed it by hand.

I took our edible glitter and poured them into bowls, so that I could roll the dough balls in the matching color.


I then put the balls on the cookie sheet and baked them.


This is how they turned out! 


I was a little worried that the food coloring made the dough too wet, but they cooked normally without any problems. We got tons of compliments on how cute they were. We were also asked for the recipe for the sugar cookies because they were soft and moist!


-chelz

Monday, August 26, 2013

Great Finds Under $6


As many of you, I LOVE Target's $1 section. I found this cute porcelain bird and little owl in there! I just couldn't resist buying them especially since they were only $1. The owl is a dark grey color it is kinda hard to tell in the picture. I will definitely be using these in my Halloween decorations to come in October, but can be used year round as well! 


Now that my kids are back in school, my 1st grocery trip to Walmart with out them again turned up some surprising things. Since I didn't have my older two kids with me, I took my time and wondered up each isle. I found this cute frosted mason jar with the bird and twig for just $2.97! It would cost me more to make this so, I snatched it up. Down another isle I found this cute barn lantern and was shocked to see it was only $5.97. Again I couldn't resist. 


I love it when you find great finds when you are not expecting it!


-chelz

LinkWithin

Related Posts Plugin for WordPress, Blogger...